Filament winder build
Rocketry involves a lot of tubes, many of which are structural, and as aerospace hardware tends to be, lightweight.
One of the best known processes for making these is filament winding, where a continuous filament of fiberglass or carbon fiber is
is saturated with resin, wound onto a mandrel (an interior mold), and left to cure. The resulting part is strong and repeatable.
Ordinary hand layups of fiberglass cloth can be used as a cheaper substitute, but they lack the repeatability of a computer-controlled process
and are more prone to delamination unless laboriously vacuum-bagged.
Filament winder in action
For my university rocket team, I built a heavily modified version of Andrew Reilley's Contraption filament winder as an Ender 3 conversion, adding a fourth axis from the bed gantry, a huge gear reduction
replacing the belt drive to run large mandrels on a NEMA 17 instead of the designed NEMA 23, and some special configuration
of Marlin firmware to glue it all together. Why go through all this trouble when you can just buy a winder, or just buy
fiberglass parts from someone else?
- Buying a winder is expensive. The cheapest commercial option is around $5000 (X-winder), and reportedly sucks.
- Fiberglass tube suppliers are few and fickle, our team was burned by one who took our money and then disappeared for a year
- There's a nifty open source design that we can build for around $500-$1000, about the cost of two 7.5"ID x 4' tubes
- We can use it to make nosecones and even maybe COPVs as well one day
Dry winding integration test
First wet wind onto a Celsius can
The redesign and build process were anything but straightforward, but I still managed to get a passable result in a little under three months.
By sourcing the control electronics and motors from an Ender 3, I was able to start on the build right away, but extensive hardware
modifications were required to fit the new motors, and accomodate for their low torque while also increasing the max mandrel size from 4" to 6".
Sadly, in the end HSP couldn't use any of the parts from the winder, since we failed to consider one thing: mold release.
Obviously to use a fiberglass part you need to take it off of your mandrel, which was easy enough with regular wet layups
that have very low if any tension applied around the mandrel. However, filament winding generates a lot of tension by design
to prevent delamination, which means that the final cured part is stuck on like a fingertrap.
Water bath to try and remove PVA
My team and I experimented with a variety of mold releases and barriers, including PVA, saran wrap, Mylar, and even condoms.
None of them ended up working well if at all, even for regular wet layups (see below). This year I'm hoping to test more methods
that I've found from other rocketry teams, and maybe even build a new mandrel design that can collapse or split to relieve tension.
Boiling hand-layup nosecone to soften 3D printed mandrel
Filament winder software
While I was working on the hardware, I also began writing software to generate the gcode for the winder.
There is an existing solution that was written to go along with the Contraption, but I had some issues with it,
mostly that it wouldn't be able to handle non-cylindrical mandrels such as nosecones, and didn't have a GUI so
less computer-nerdy engineers would have trouble using it. I originally chose to write it in Python because I'm more familiar with it,
producing the first version of my CAM software called gcode_gen.
Nosecone path in MeshInspector
The validation process was a lot of trial and error, since I didn't have a way to easily visualize the path other than
importing into an online viewer, and even that required running the code in a special mode so that all the movements
would be properly recognized. Eventually I got the winding kernel itself passable, and was staring down work on a GUI.
Luckily this was right around when vibe coding was starting to get good, so I cooked up a quick and dirty visualizer with
ChatGPT, and it turned out pretty well.
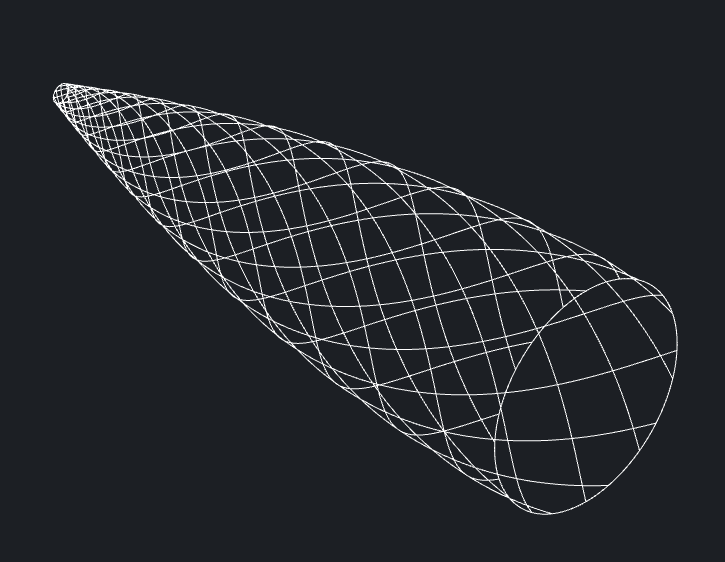
Nosecone path in homebrew viewer
Of course, there were also user interface problems with this software as well. My decision to use Python meant an easy start,
but was a huge pain to distribute and run on other machines. Also, it was really slow as python tends to be. After some reasarch,
I settled on switching the entire program over to Go for execution speed, reduction in executable size (Python was around 100M and growing),
and better support for cross-platform distribution (I can build for Windows, Linux, and macOS with a single command). I'm still working on the GUI,
but the core functionality is working on the command line and I'm pretty happy with the result. See where cocoon
is at now by following the link.